group-docs
Getting started with Docker
Below are resources on getting started with docker and how to use docker as part of your development process for Echopype.
What is docker?
Docker is actually a company that promotes and evolves self-sufficient container technology. The underlying codebase for docker is maintained within the open-source Moby project.
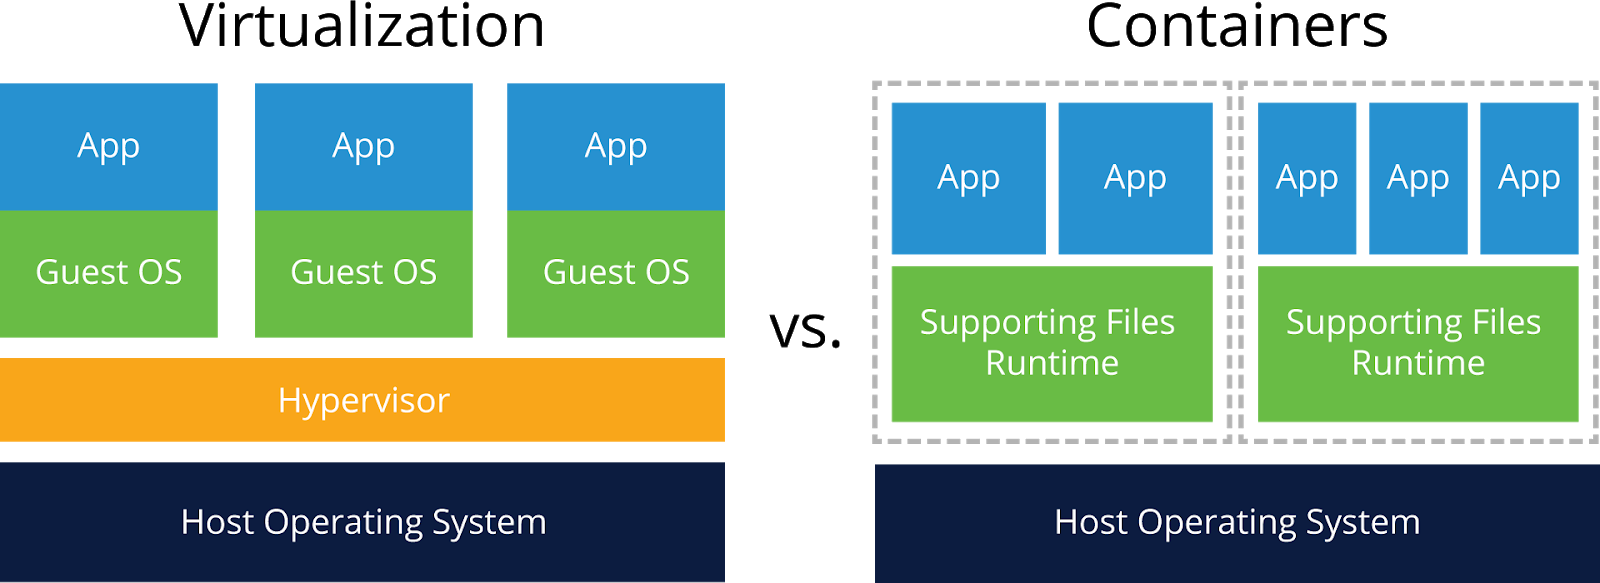
What are containers?
Containerization is a software virtualization method. It is closely related to Virtual Machine, but ARE NOT virtual machines (VM).
- VMs (Full Virtualization)
- on top hypervisor, a kind of emulator.
- be installed over host OS or bare-metal without host OS
- hardware emulated by hypervisor from avail. resources of the host
- guest OS installed on top of emulated hardware
- requires extensive overhead to reach the physical hardware/outside world
- Containers (OS Level Virtualization)
- light-weight environment that virtualizes and isolates resources for app (microservice)
- container image is source/template of the container, has all dependencies
- container runs directly on host OS, no need of guest OS does not use hypervisor
- host OS need virtualization capabilities to provide the isolation and resource allocation
- user space component of the container should be compatible with host OS
Install Docker
These instructions assume that Docker has already been installed on your computer. If Docker has not been installed, follow the instructions based on your operating system.
Find Docker Images
Existing docker images are available on Docker Hub.
The two docker images that are being used by Echopype are:
You can find lots of docker images that the community has built in this hub by searching in the search box.
Download Docker Images
To obtain the docker image, copy the Docker Pull Command to use in your terminal. The docker pull command gets the latest version of the docker image from the Docker Hub.
docker pull cormorack/http
View Docker Images
The docker images command shows you all the docker images that you have available on your local machine.
docker images
Run Docker Containers
The docker run command starts a new docker container using a docker image.
A docker image is a filesystem and parameters to use at runtime. It doesn’t have state and never changes. A docker container is a running instance of an image.
docker run -it --rm -p 80:80 --name my_container cormorack/http
The ‘-i’ flag specifies that you want to run the docker container interactively. The ‘-t’ flag specifies that you want run a pseudoterminal when the container is started. The ‘–rm’ flag specifies that this container will be removed on close, cleaning up the docker system. The ‘-p’ specifies port mapping; port 80 within the container will be mapped to port 80 on the host machine. The ‘–name’ flag specifies a name chosen by you for the container. If you do not use the ‘–name’ flag, then a name will be automatically assigned to the container.
Once the container is spun up, open a web browser and go to http://localhost/data/. You should see all the test data files used in echopype on there.
Use ctrl+c to leave the docker container.
Echopype testing environment
As mentioned above, we use 2 docker images for setting up the echopype testing environment, minioci and http. These two images are built from the two *.dockerfile in echopype/.ci_helpers/docker. To run these two images simultaneously in a local environment, we use docker-compose.
You can install docker-compose with conda!
What is docker compose?
Compose is a tool for defining and running multi-container Docker applications. With Compose, you use a YAML file to configure your application’s services. Then, with a single command, you create and start all the services from your configuration.
The echopype docker-compose configuration can be found in the same docker folder as above in a file called docker-compose.yaml.
You can follow the echopype contributing page to setup the development environment and run the tests.